Expense reports: monthly PDF export and per-client tracking with ScanTicket
ScanTicket 8.7.4 turns the receipt-scanning app into a professional expense-report tool. Tag each receipt with a client or guest, export a ready-to-send PDF expense report for your manager or accountant, and track your spend grouped by client. Built for field sales reps, consultants and freelancers who need to justify their expenses to an employer or to the tax office.
1. Tag every receipt with a client or a guest
You take a prospect to lunch, you keep the receipt in your pocket... and three months later, you have no idea who you were dining with. Most tax offices require the guest's name to accept the receipt as a deductible business meal. ScanTicket fixes this in two taps.
- Open ScanTicket and tap the receipt you want to enrich in the list.
- Below the amount, tap the "+ Client / Guest" button.
- Type the person's or company's name. ScanTicket auto-suggests names you've already used on other receipts — handy to keep things consistent when the same client comes back.
- Save. The client appears immediately on the receipt cell in the list, with a 👤 [name] badge — visible without having to open the receipt detail.
Why it matters: in France, the URSSAF requires the guest's name to accept a client meal, business gift or service as a deductible expense. The same rule applies in Belgium, Italy, Spain and Germany (Bewirtungsbeleg). Without that name, the meal is reclassified as a benefit in kind and loses its deductible status.
2. Export your monthly expense report as a PDF
Rebuilding an expense report three months after the fact is a nightmare: you dig out paper receipts, you re-key amounts, you forget a client lunch. With ScanTicket's PDF export, you get a complete document in seconds — ready to email to your manager, your HR team or your accountant.
- Open the Monthly view.
- Tap the "..." button in the top right.
- Choose "Export expense report (PDF)".
- Pick the period (a single month, a quarter or a custom range). The PDF is generated and opens in the iOS share sheet — email it, AirDrop it or save it to Files.
The generated PDF contains:
- A cover page: period, user, totals per currency (subtotal, VAT, total), receipt count.
- A monthly summary page: a table with date, merchant, category, client, subtotal / VAT / total amounts.
- The appendix: each receipt as an image, one page per receipt, with a header (date, category, amount, client if set). The manager sees the proof behind every line at a glance.
Pro feature. The PDF export is included in the ScanTicket Pro subscription. If you bill your expenses to an employer or to clients, the cost pays for itself on the first report: no manual re-typing, no missed receipts, archive-ready format that complies with multi-year retention rules.
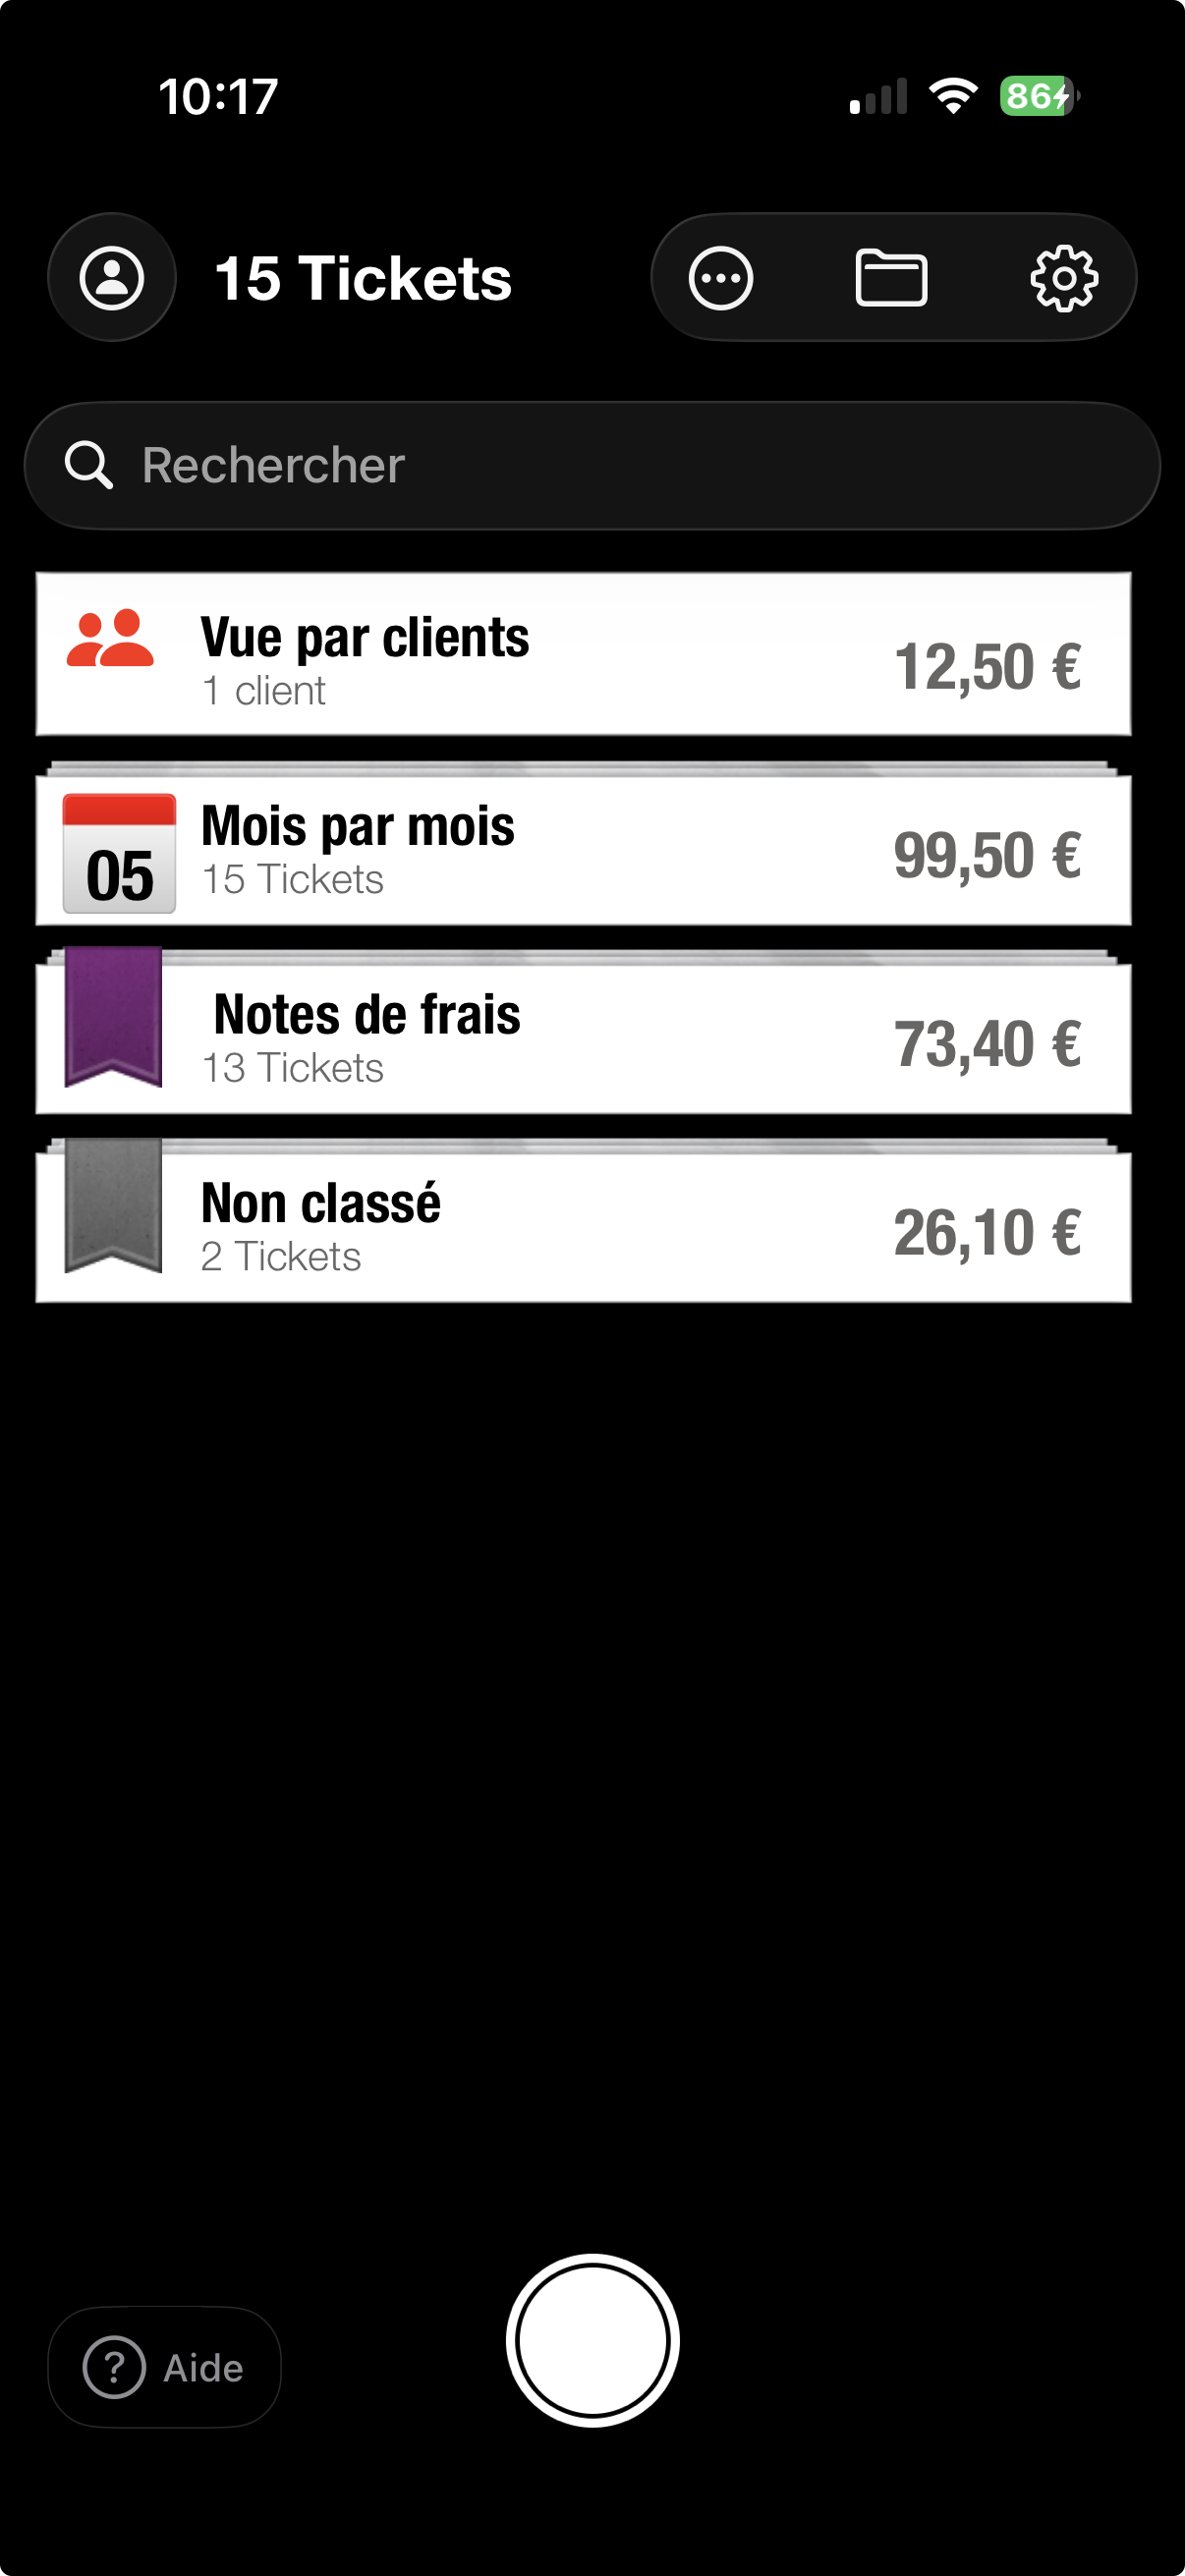
3. Track your spend per client
How much did you spend on Acme Corp this quarter? Which client costs you the most in entertainment? Without a per-client breakdown, those questions go unanswered. As soon as at least one receipt has a client tagged, ScanTicket automatically shows a new "Clients view" cell on the home screen.
- On the home screen, tap the "Clients view" cell (group-of-people icon).
- The app shows every identified client, with the receipt count and the total spent per currency for each.
- Tap a client to see all their receipts, sorted by descending date.
- Tap a receipt to open the full detail, edit the amount or check the proof image.
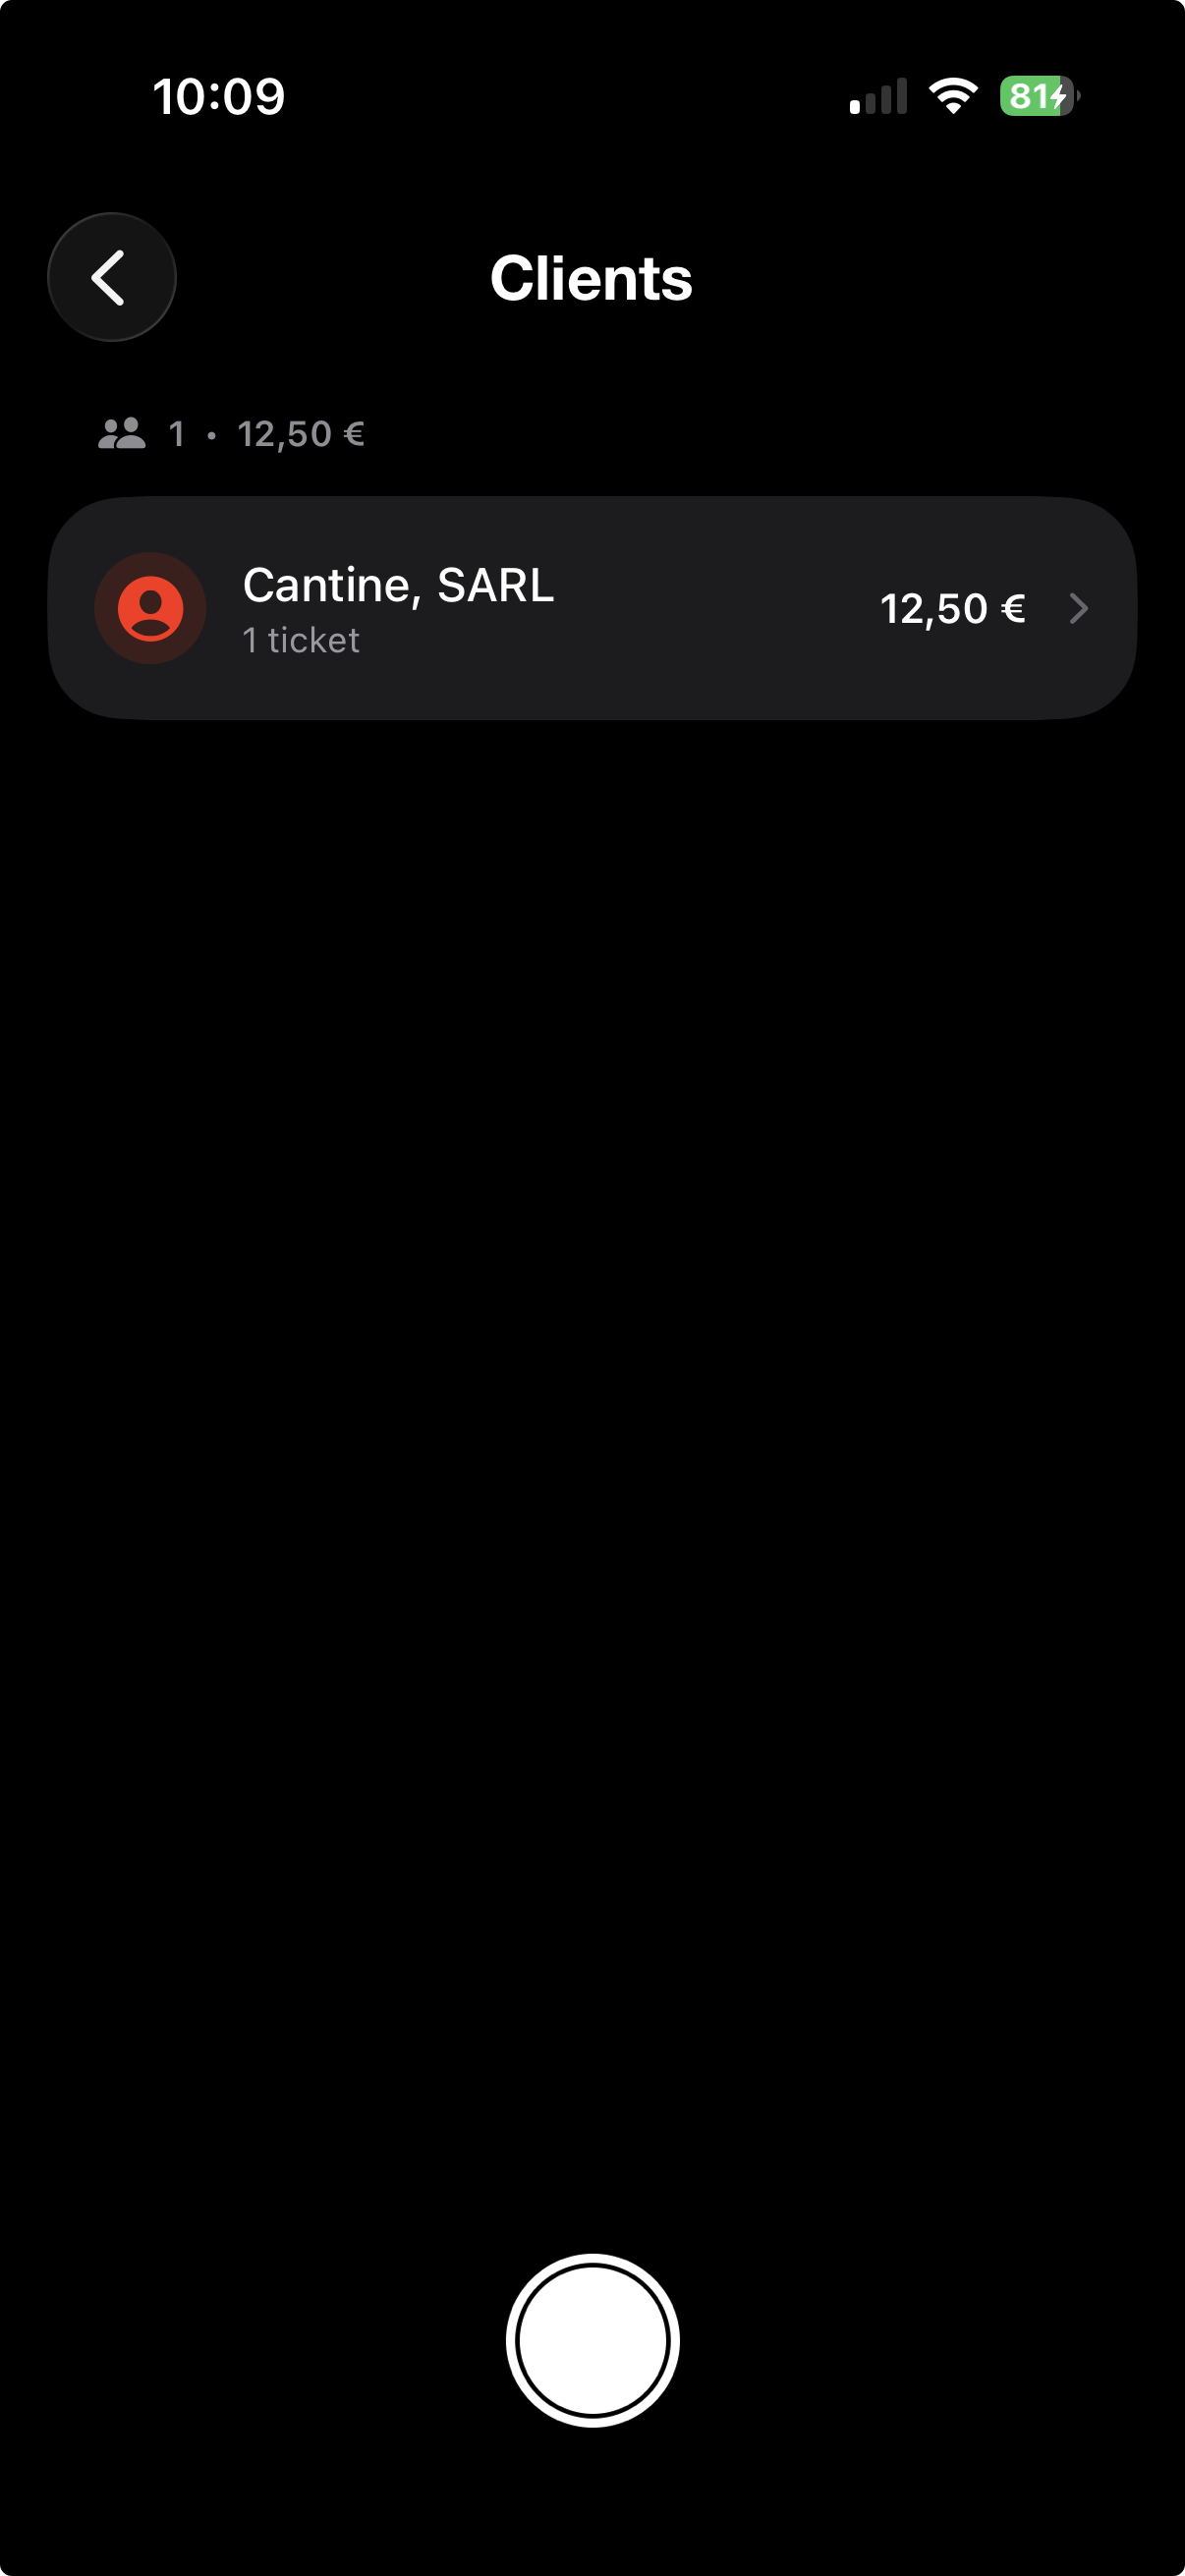
Use case: a consultant rebills expenses to clients at the end of an engagement. With the per-client view, they instantly see the total per client and break it down on the invoice. A multi-account sales rep sees at a glance which client drives the highest entertainment spend — useful for per-account profitability.
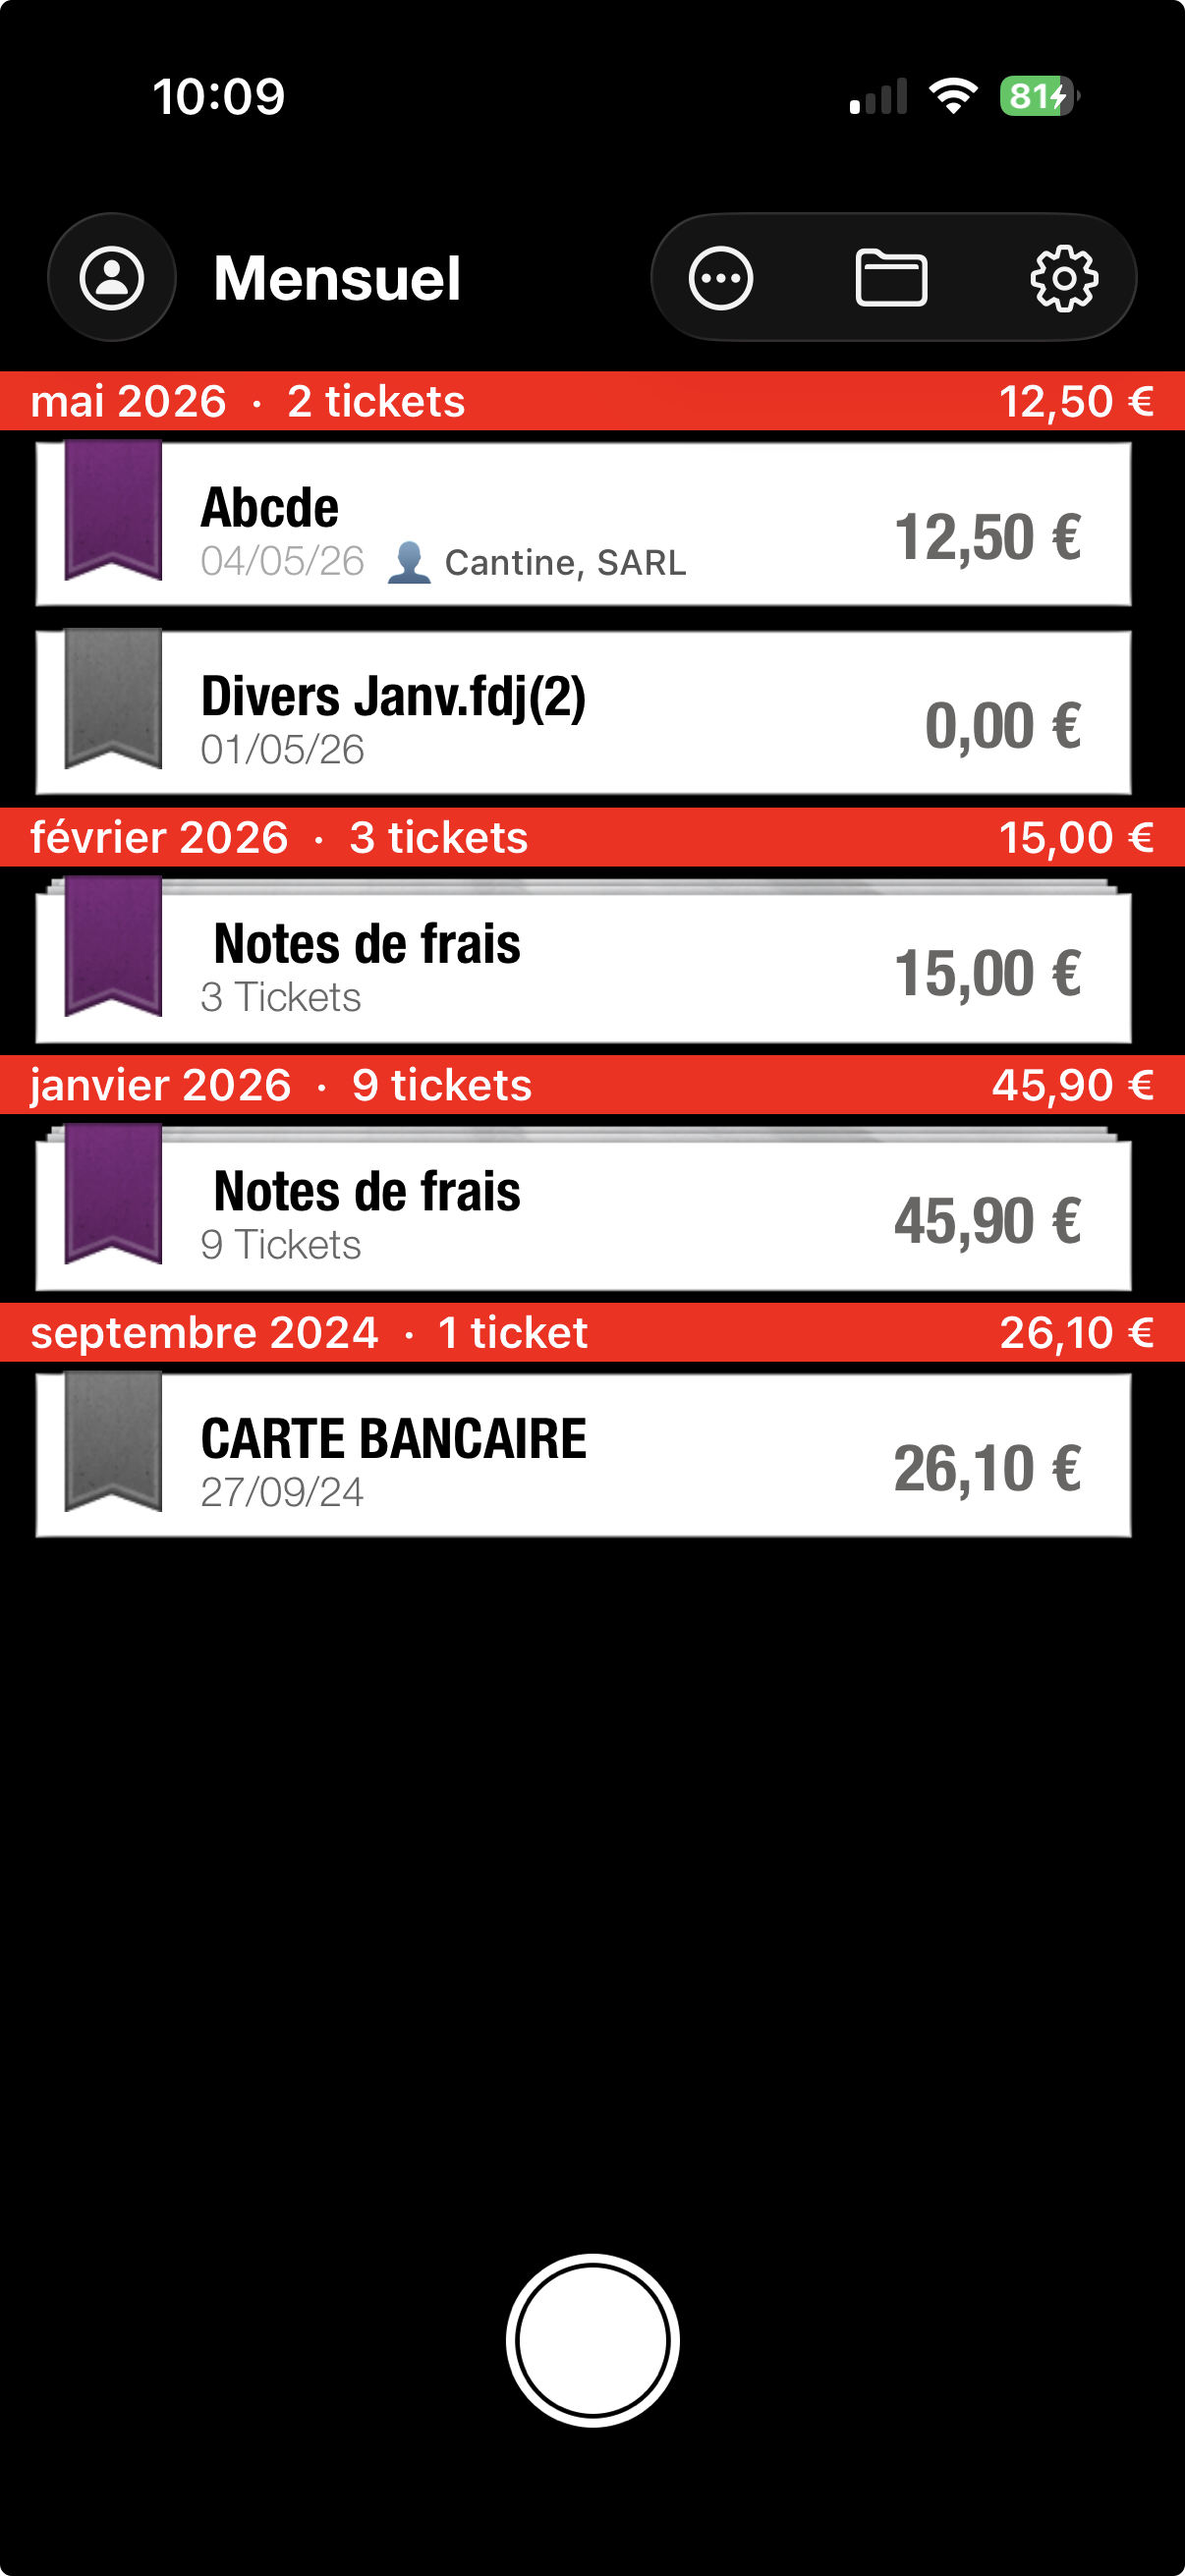
4. Detailed monthly view: every receipt, line by line
To validate an expense report, you want to see every receipt in chronological order, not an aggregate by category. The Monthly view now offers two display modes that you can flip between any time.
- Open the Monthly view.
- Tap the "..." button in the top right.
- Choose "Show all receipts" to display every receipt, line by line, in chronological order.
- To switch back to the compact display, tap "..." again and choose "Group by category" (the default mode).
Tapping a month opens a rich drill-down screen with everything you need to justify the period:
- By category: total spent per category for that month (Expense reports, Uncategorised, etc.) — handy to break down the report before export.
- Clients hosted this month: aggregated list of clients/guests for the month, with the number of invitations and total spent per person — exactly what tax authorities ask for during an audit.
- Chronological receipts list: each receipt with its client badge visible directly on the cell.
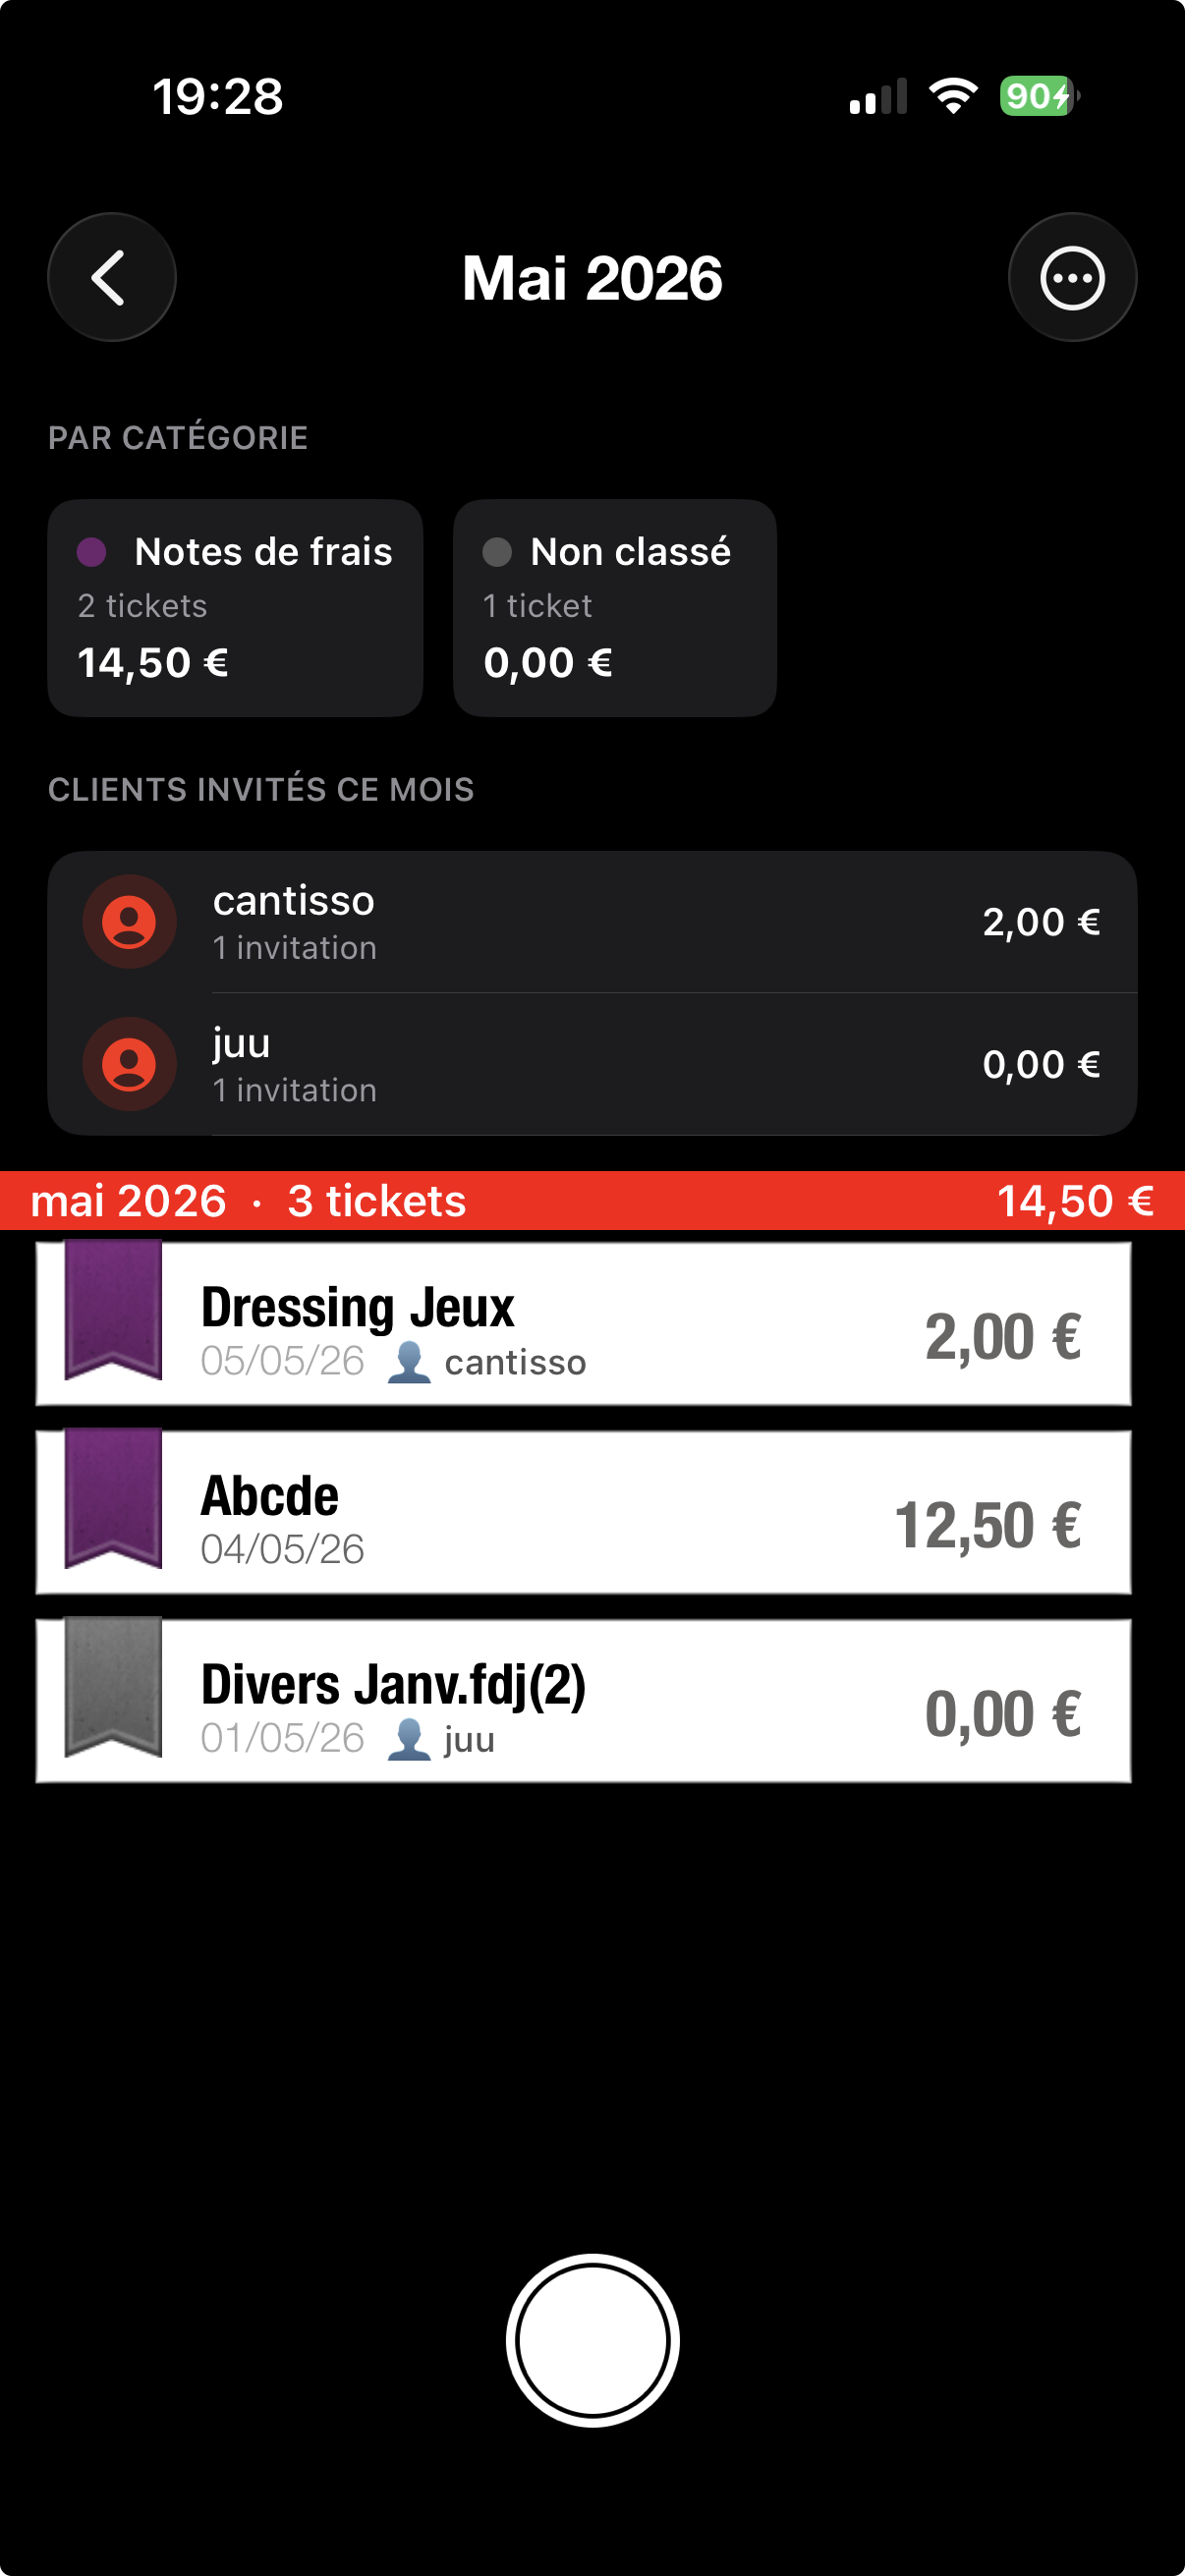
Useful before export: in "Show all receipts" mode, scroll through the month line by line before generating the PDF. If a receipt is missing, a client wasn't tagged, or a category is wrong, you spot it immediately and fix it before sending the report to your manager.
5. Customisable home screen: open the app on the view that matters
If you manage your expenses by period rather than by individual receipt, opening the app on the receipts list costs you a tap on every launch. You can now choose which view appears at startup.
- Open Settings (gear icon, top right).
- Find the "Home screen" section.
- Choose between Receipts (the classic list) and Monthly (the month-by-month view).
- Next launch, ScanTicket opens straight on the chosen view.
Tip: sales reps who file their report at month-end usually prefer Monthly at startup. Freelancers who scan as they go prefer the Receipts list. You can switch any time without losing data.
Wrap-up: automate further
The Expense Reports feature fits into a complete workflow for travelling professionals: scan the receipt right after the meal, tag the client in two taps, and at the end of the month export your PDF. No more crumpled tickets at the bottom of a bag, no more missed expenses, no more last-minute Excel typing the night before submission.
To go further, also see:
- Automatic invoice import from iCloud Drive — drop PDFs into a folder and they show up in the app.
- Export documents for your accountant — XLS / CSV export for the year-end report.
- Archive accounting years — hide past fiscal years to keep your view clean.